The Rabbit is so Able thanks to readers like you! Some links in this article are affiliate links, which means we may earn a small commission if you make a purchase—at no extra cost to you. Thanks for supporting the Rabbit!
This article was last manually reviewed for data accuracy on 14 October 2025.
If you are someone who often finds the chaos of sticky notes, scattered spreadsheets, notepad task lists, and endless email threads flagged to be followed up later – trust me, you’re not alone.
As a tool, ClickUp is the most efficient free productivity app, can make your life simpler if you know how to use it effectively. This article (we have named it ClickUp for Beginners) will help you learn the basics of this powerful tool so that you can start using it from today itself.
In this guide, you’ll learn how ClickUp’s hierarchy works, explore its most useful features, discover real-world use cases, and get a clear picture of its pricing plans. Whether you’re a freelancer, student, or team leader, this article will help you in your ClickUp journey. So, let’s start!
What is ClickUp?
ClickUp is an excellent all-in-one productivity app designed to replace the need to use multiple separate tools. It is a customizable tool that makes project management easier by consolidating tasks, documents, goals, and communication into a single platform.
The key strengths of ClickUp are its flexibility and ease of use.
Even if you are new to ClickUp, the intuitive tool can help you easily track and manage anything from simple to-do lists to complex sprints. You can track and monitor progress and status with a range of views: List, Board, and Calendar.
However, if you are a ClickUp beginner, the most impressive thing is its generous Forever Free tier that makes it easy to try out ClickUp for free.
ClickUp for Beginners – Understanding ClickUp Hierarchy
Before you start with ClickUp, you must understand how the ClickUp Hierarchy works. In this section of this ClickUp for beginners guide, we will introduce you to the different concepts related to ClickUp Hierarchy and explain the concepts with the analogy of a cupboard.
In general, ClickUp offers six Hierarchy locations. The following schematic representation explains how the different hierarchies are related to your overall project management structures.
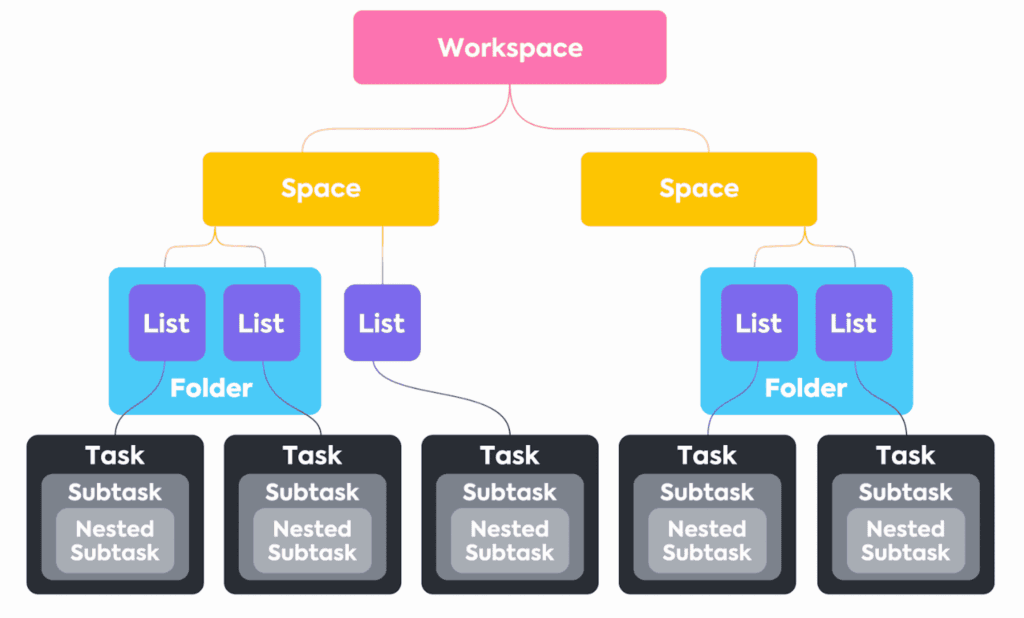
Workspace
Think of your workspace as the big cupboard itself. It’s the container that holds everything inside—your shelves, drawers, boxes, and items. In other words, the ClickUp Workspace contains your complete organisation and is the umbrella for all your work.
It is recommended to have only one Workspace per organisation.
Spaces
Spaces are the shelves inside your cupboard. Each shelf organises things by category or purpose (e.g., Work, Personal, Clients). Just like you dedicate one shelf for clothes and another for books, you dedicate spaces for broad areas of work.
In ClickUp, you use Spaces to arrange different workflows or types of work. For example, you can organise Spaces by departments, teams, high-level initiatives, clients, or anything that makes sense for you to group.
Note that Each Space has its own settings and can be shared with everyone in the Workspace or be made private, allowing you to choose who has access to it.
Folders
Think of folders as your storage boxes. Inside a shelf, you might keep boxes to group related things. For example, on your Work shelf, one box could be for Marketing Projects and another for Product Development. In ClickUp, these boxes are folders that group lists together.
Folders are optional in ClickUp, but they are helpful for more complex workflows.
You can add Folders to a Space, and then add Lists to Folders and organise your projects. Remember that when you create a new Folder, it automatically gets a List. If you are a part of an Agile software team, you can use Sprint Folders to keep your sprints organised.
Lists
Within each box, you arrange items in stacks—like a pile of shirts, notebooks, or files. In ClickUp, a list holds related tasks, like Website Redesign tasks inside your Marketing Projects folder.
In general, Lists contain tasks of a similar type or that have a similar outcome or goal.
Lists can be added to Spaces or Folders. Again, Agile software teams can include regular Lists in a Sprint folder alongside the respective sprints. Lists are an excellent tool for managing a backlog of tasks before adding them to a sprint.
Tasks
These are the actual things you use and work on. Each shirt or book inside your cupboard represents a task—something specific you can pick up, handle, and complete.
Tasks are the basic, actionable parts of your projects. They can come with a set of default sections and customizable options to hold all of the info about your work.
Subtasks
A shirt has buttons, or a book has chapters. These are subtasks—smaller components of a larger task.
You add subtasks to a task to keep track of more granular action items. For complex projects, you can create layers of nested subtasks.
ClickUp Hierarchy: The Cupboard Analogy
| Cupboard | Workspace |
| Shelves | Spaces |
| Storage Box | Folders |
| Stacks of Items | Lists |
| Items | Tasks |
| Buttons, pockets | Subtasks |
Benefits of ClickUp Hierarchy
The Hierarchy in ClickUp has the following benefits:
- It creates a proper structure for your work that is highly scalable. You can expand the Hierarchy as per your needs.
- Hierarchy lets you control access to Items and locations. You can make them private or shared and decide how to manage access to sensitive information.
ClickUp for Beginners – Step-by-Step Guide to Get Started
In this section, we are going to walk you through the different steps to follow to start using this productivity tool. By the end of these exercises, you’ll have a clear understanding to set up your workspace, organise your tasks, and collaborate with your team seamlessly.
Tip: Before going through these steps, we recommend that you create a free ClickUp account so that you can follow these steps in parallel.
Sign Up and Create Your Workspace
The first step before using ClickUp is creating your account. Note that you can start for free by creating a free account. Follow the steps below to create your account in ClickUp.
- Visit ClickUp.
- You will find the Login and SignUp buttons in the top right in the header section of the ClickUp website.
- If you already have an account, click on the login button. Otherwise, click on Sign Up.
- ClickUp lets you sign up with your work email. You can even sign up with your Gmail.
- Sign up with your email/Gmail, and confirm your account to access the portal.
- The first time you log in, ClickUp will ask you a few questions to personalise your experience. You will be prompted to go through a series of questions in a wizard style.
- What would you like to use ClickUp for?
- What would you like to manage?
- How did you hear about us?
- Invite people to your Workspace – you can invite your team members later as well.
- Do you use any of these tools? Basically, a list of other project management tools that serve a similar user base.
- Which features are you interested in trying?
- Lastly, what would you like to name your Workspace? Give your workspace a suitable name (e.g., “Marketing Team” or “Personal Projects”)
- So, at the end of this wizard, you will have created your own Workspace. We have already explained what Workspace is in the ClickUp hierarchy. Just to recap, it is the central hub for all your projects – your cupboard.
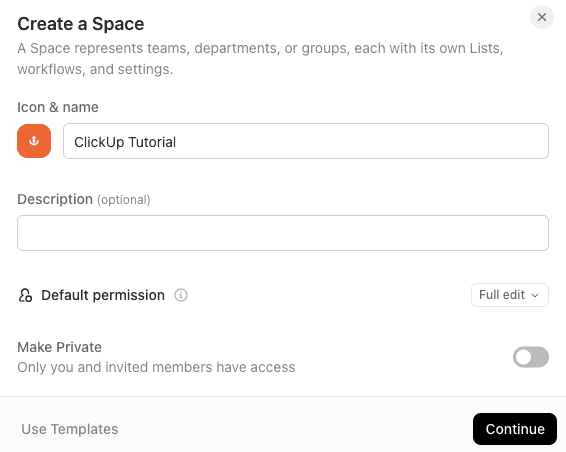
Set Up Spaces
- Usually, ClickUp creates a dummy space for you.
- But you can, and you should create a new space using the New Space link or action on the left-hand side.
- You can give a name, choose a colour and an icon, as well as a description for your new Space. Optionally, you can choose to make it private.
- Spaces help you to organise your tasks, as explained in the ClickUp hierarchy section earlier.
- Space creation follows an intuitive wizard, wherein you can choose a pre-configured workflow to default the behaviour.
- You can, of course, customise the defaults as shown in the screenshot below.
Create Folders and Lists
Inside each Space, you’ll build out Folders and Lists to organise the tasks further.
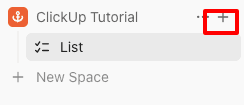
- Click on the + icon as highlighted in the screenshot to create your folders (optional) or lists.
- An interesting thing to note is that ClickUp creates a default list with every newly created Space.
- Click on the three dots beside the list or folder name to update relevant metadata like name, colour, icon, etc.
Add Tasks and Subtasks
After you have created a list, it is time to create tasks. Tasks are the heart of what you are going to do.
You can click on the Add Task action and add a task that you want to track and manage.
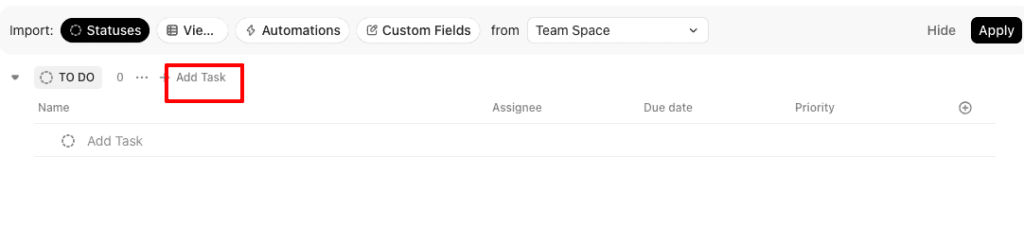
Each task can include details like descriptions, due dates, assignees, checklists, attachments, and even priority levels.
You can break down big tasks into subtasks for better clarity and granular tracking.
For example, a task named “Write Blog Post” might include subtasks like “Research Keywords,” “Draft Content,” and “Publish.”
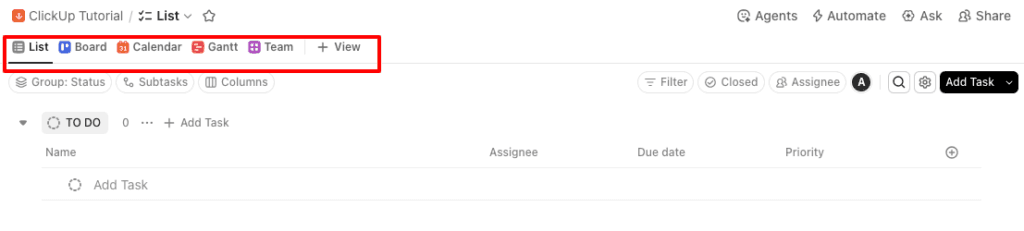
Choose Your View
One of ClickUp’s best features is its multiple views.
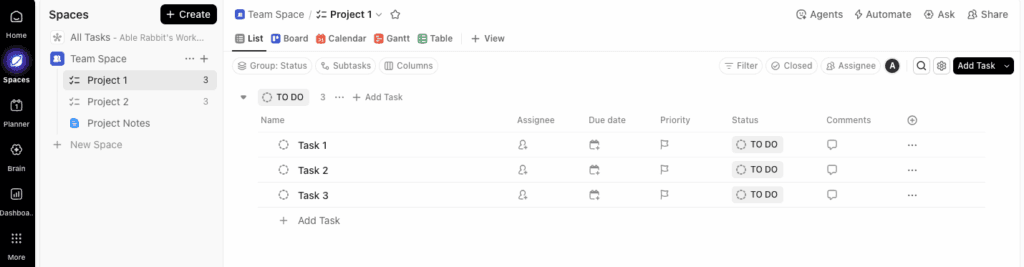
Note that not all view types are available in the Free tier. But as a beginner, you can start with the simplest to-do list style – List View.
You can also try using the Board View (similar to Kanban boards like Trello). As you get comfortable, you can try Calendar View for scheduling or Gantt Charts for project timelines. Switching between views helps visualise work in the way that suits you best. You can change the view by choosing any of the tabs highlighted in the screenshot below.
If you need the other advanced views, you may have to upgrade to ClickUp’s paid plans.
Takeaway
As you can understand, getting started with ClickUp doesn’t have to be intimidating. By following this step-by-step process—workspace → spaces → folders → lists → tasks you can quickly learn ClickUp and master the tool to stay productive, organised, and in control of your projects.
ClickUp for Beginners – Essential ClickUp Features
Here we’ll talk about a few essential ClickUp features that you must be aware of.
Task Management
ClickUp lets you streamline and organise the work. At its core, task management in ClickUp revolves around Lists, Statuses, and Priorities. Let us understand these terms.
Lists, Statuses, and Priorities
- Lists: Organise tasks within folders and spaces. Think of them as “to-do categories” for projects (e.g., Marketing Campaign, Blog Posts, Sprint Backlog).
- Statuses: Show where a task stands in the workflow. You can customise these (e.g., To Do → In Progress → Review → Done).
- Priorities: Assign urgency so your team knows what needs attention first.
| Element | Purpose | Best Practice |
|---|---|---|
| Lists | Group related tasks under one workflow. | Keep lists specific (e.g., “Content Calendar” vs. “General Work”). |
| Statuses | Track progress at a glance. | Start simple with 3 or 4 statuses. Add more as workflows mature. |
| Priorities | Indicate urgency (Urgent, High, Normal, Low). | Always set priorities to avoid treating all tasks equally. |
Time Tracking and Reminders
ClickUp is equipped with features that help you track time and manage reminders.
- Time Tracking:
- ClickUp has a built-in timer that lets you log how long you spend on each task.
- This feature is incredibly useful for freelancers, agencies, or teams who need to track billable efforts.
- You can even export the data into reports for performance insights.
- Reminders:
- With ClickUp, you can create personal or team reminders so that deadlines are not missed easily.
- These reminders can be scheduled by date, recurring pattern, or linked to task deadlines.
- You can even integrate these reminders with email, mobile push, or desktop notifications.
| Feature | Benefit | Who It Helps Most |
|---|---|---|
| Time Tracking | Monitor effort and log billable hours. | Students, busy professionals, and teams. |
| Reminders | Prevent missed tasks or deadlines. | Students, busy professionals, teams. |
Views in ClickUp
ClickUp shines because of its flexible views that let you visualise work in the way that suits your style or project. So, what are the different types of views you get?
- List View: The most structured view—tasks appear in rows with details like assignee, due date, and priority.
- Board View: A Kanban-style drag-and-drop board—great for agile projects or visual thinkers.
- Calendar View: See tasks by due date—ideal for content planning, deadlines, or scheduling.
- Timeline View: Similar to Gantt charts—perfect for long-term project planning and dependencies.
| View | Best For | Why Use It |
|---|---|---|
| List | Task-heavy projects with details. | Visualise time-bound work. |
| Board | Agile workflows, creative projects. | Visualise time-bound work. |
| Calendar | Content planning, deadlines. | Visualize time-bound work. |
| Timeline | Complex projects with dependencies. | Big-picture view of project phases. |
Collaboration Features
ClickUp isn’t just a personal productivity tool—it’s built for teams. Here are a few of the collaboration features that you must be aware of.
- Task Assignments: You can assign tasks to one or multiple team members.
- Comments & Mentions: ClickUp lets you manage and keep discussions inside tasks and tag teammates for quick input.
- Docs & Whiteboards: You can create shared documents or brainstorming boards within ClickUp.
- Real-time Editing: You can work simultaneously on Docs or Whiteboards, similar to Google Docs.
- Sharing & Permissions: With ClickUp, you can control who can view, edit, or comment on specific tasks or documents.
| Feature | Benefit |
|---|---|
| Task Assignments | Clear ownership and accountability. |
| Comments & Mentions | Keep communication context-rich. |
| Docs & Whiteboards | Central hub for notes, plans, and brainstorming. |
| Real-time Editing | Seamless collaboration, no version conflicts. |
| Sharing & Permissions | Control visibility and maintain security. |
For the ClickUp beginner: the key is to understand ClickUp hierarchy, master the task management basics, effectively use its time tracking and reminders features, and explore different views to identify which is the best for you. If it is applicable for you, make use of the collaboration tools.
ClickUp for Beginners – Advanced ClickUp Features
While you can easily start with the free tier of ClickUp, its more powerful features can efficiently automate your busywork, provide executive oversight, and connect your entire tech stack.
The three pillars of this power that we are going to discuss now are:
Automations
Automations in ClickUp can help you get rid of several manual activities, thereby reducing your efforts. For example, you can automatically change a task status, notify a team member, or apply a template the moment a task is completed or moved.
For a beginner, you can start with simple, pre-built Automations like When status changes to Done, then archive the task.
When you are comfortable, explore complex sequences or build custom automations using ClickUp’s AI abilities.
Dashboards
The Dashboards in ClickUp give you a custom reporting tool to have a bird’s-eye view of your project. It lets you have real-time control of your workspace. The beauty of ClickUp dashboards is that, unlike a static list, they can visualise data from across the entire workspace.
You can even add widgets to track the workload of your team, or view task status in a customizable chart, or monitor progress.
Integrations
Integrations let you connect ClickUp to other essential business and productivity tools that you may be using. For example, you can connect ClickUp with Google Calendar to sync the deadlines. You can integrate Gmail to turn an email into a task. You can even use Zapier to automate multi-app workflows.
As you can understand, depending on the nature of integrations you use, you can easily convert ClickUp into a unified productivity hub for your entire business.
ClickUp for Beginners – Tips to Maximise Productivity
ClickUp is packed with features, but as a beginner, you can feel overwhelmed or may try to use it in a way that slows you down. So, we have listed down a few best practices to maximise your productivity.
| Start Simple with the Hierarchy | Don’t try to set up everything at once. Begin with Workspaces → Spaces → Folders → Lists → Tasks, and expand only when your workflow demands it. |
| Leverage Templates | Use ClickUp’s built-in templates for project management, content calendars, or personal to-do lists. This reduces setup time and gives you a structure to build on. |
| Use Custom Views | Switch between List, Board, and Calendar views depending on your work style. For example, Boards work great for agile sprints, while Calendars help track deadlines. |
| Automate | Set up simple automations like moving tasks when statuses change or assigning tasks to teammates when due dates are set. |
As a beginner, you must also be aware of a few common pitfalls to make your workflow more streamlined. The following table lists a few of these common mistakes that you should avoid.
| Overcomplicating Early On | Do not fall into the trap of adding too many statuses, tags, and custom fields. This will clutter the workspace and reduce clarity. Start with a minimal setup and add complexity gradually as necessary. |
| Ignoring Task Dependencies | Do not forget to link dependent tasks that can cause bottlenecks. Always set dependencies to avoid blocked work. |
| Not Using Priorities | Remember to set the priorities of tasks – Urgent, High, Normal, Low. Make it a habit to assign priority levels. |
| Neglecting Regular Reviews | A cluttered ClickUp account quickly becomes as messy as sticky notes. Schedule weekly reviews to archive, clean up, and reprioritise tasks to keep your workspace clean and manageable. |
Bottomline:
- Start simple.
- Keep it simple and build gradually.
- Use templates and features as far as possible.
ClickUp Pricing: Free vs Paid Plan
The best thing about ClickUp for beginners is its perpetual free tier is ideal for individuals and small teams just starting.
We have analysed the ClickUp pricing and costs per user per month in minute detail. Please spend some time reading through the Free vs. Paid Plans & Features.
If you sign up for ClickUp’s free plan, which you must do to explore the platform, you will get access to the following ClickUp features:
- Unlimited members
- Unlimited tasks
- Two-Factor Authentication
- Kanban boards
- Sprint Management
- Calendar View
- Collaborative Docs.
- Basic Custom Field Manager
- In-App Video Recording
- 1 Form
- 24/7 Support
Though the Forever Free plan is a fantastic way to test ClickUp, you must note that the Free plan has a few limitations.
- There is a restriction in storage (typically 60MB).
- Also, there are limits on the usage of items like Custom Fields, Automations, and Dashboards.
If you find that the Free Tier of ClickUp is limiting your requirements, you must upgrade to one of the three paid plans mentioned below.
| Plan | Pricing |
|---|---|
| Unlimited | $7/user/month billed annually |
| Business | $12/user/month billed annually |
| Enterprise | Custom pricing |
These paid tiers unlock multiple powerful features of ClickUp that can potentially improve your project management experience.
| Paid Plan | Who | Needs |
|---|---|---|
| Unlimited | Small team | Advanced features – Workload Management, Granular time tracking, Advanced security (like Google SSO), Unlimited access to all views and Dashboards. |
| Business | Growing Business | Advanced features – Workload Management, Granular time tracking, Advanced security (like Google SSO), Anlimited access to all views and Dashboards. |
| Enterprise | Large Business | Advanced features – Workload Management, Granular time tracking, Advanced security (like Google SSO), Unlimited access to all views and Dashboards. |
In short, while you can start with ClickUp as an individual free-tier user, this powerful all-in-app tool has features required by small teams to large enterprises. If you find that ClickUp’s free plan is limiting the efficiency and output of your team, go ahead and upgrade!
ClickUp for Beginners – Real-World Use Cases
In this section of our ClickUp Guide for Beginners, we will look at three specific real-life use cases.
ClickUp for Freelancers: Organise Clients and Track Hours
If you are a freelancer, we understand that managing multiple clients is a chaotic process. But ClickUp makes it easy to manage your projects as a freelancer.
- You can keep all your projects in one place, track billable hours, and set deadlines so nothing falls through the cracks.
- With task lists, custom statuses, and built-in time tracking, you’ll always know what needs attention.
In short, whether you are a Freelance designer or into Freelance consulting, ClickUp helps you to stay productive, organised, and agile.
ClickUp for Students: Stay on Top of Courses and Assignments
The interesting thing is that ClickUp is an equally powerful tool for Students. In particular, its free plan is lucrative enough to try it out.
If you are a student, you can use ClickUp to balance your classes, assignments, and projects.
- You can organise classes or courses into spaces.
- Not only can you track deadlines, but you can also collaborate with classmates effortlessly.
- You can create checklists, attach study materials, and set reminders to never miss a due date.
Using ClickUp as a productivity app, students can break large projects into manageable tasks and improve their overall academic performance.
ClickUp for Small Teams: Streamline Projects and Collaboration
If you are a small business or a small team, ClickUp can help you manage your content calendars, track your sales pipelines. It can even help you organise sprints efficiently. In short, it can be the most efficient tool in your project delivery space.
- You can assign tasks to stakeholders, monitor the progress in real-time, and collaborate efficiently, keeping your team always in sync.
- As a project management tool, ClickUp can increase transparency, accountability and efficiency of your team.
To summarise, these real-life use cases demonstrate that ClickUp has powerful features that can help you stay organised, track tasks, and boost productivity.
ClickUp for Beginners – Recap
In this step-by-step guide, we’ve covered everything you need to get started with ClickUp:
- We have discussed the fundamental ClickUp concepts – the ClickUp hierarchy and the essential features of ClickUp that you must know as you start using this powerful tool.
- We walked you through the different steps to start using ClickUp.
- We talked about the real-life use cases of ClickUp for beginners.
- We also had a glimpse at ClickUp pricing to understand when you must upgrade from a free user.
- We briefly talked about a few advanced features of ClickUp that you are sure to explore as you graduate in your ClickUp journey.
The beauty of this powerful tool is that you can sign up for free for a completely free plan and can explore the platform freely. If you are a beginner, sign up today and unlock ClickUp’s potential for free. Explore the tool. I am sure ClickUp will prove to be a powerful and effective tool to help you stop juggling and start succeeding!
Want to dive deep into Clickup? Explore our Clickup Resource Hub for expert guides and tips.
Leave a Reply